Tuesday, 27 October 2015

Human Hybrids Introduction

In our session with Kat, we were introduced to the second half of the unit, The Human Hybrid. A hybrid is created by combing two or more species of mixed origin. For this part of the unit, we have to 'use the concept of physical transformation as a point of inspiration, design a creature character to represent the theme of The Brave New World. The aim is to create a new understanding of beauty, one that is derived form creating a human hybrid that is a link between nature and beauty'. We have to de-construct, re-invent and present alternate representations of the cosmetic body.

The name 'Hybrid' is derived from the latin 'hybrids', which meant 'offspring of a tame sow and wild boar', or 'child of freeman and slave' etc. Hybrids are essentially a cross-breed, which can be produced by scientific modification of cells, or sexual reproduction of two breeds of species. Hybrids can be categorised into seven sections:

  • Single Cross Hybrids- the result of two true breeding organisms. (F1 Hybrids - meaning Filial 1, or 'first offspring').
  • Double Cross Hybrids - the result of two F1 Hybrids mating.
  • Three-way Cross Hybrids - One F1 Hybrid mating with another of an inbred line.
  • Triple-cross Hybrids - result from two three-way cross hybrids mating.
  •  Population Hybrids - the crossing of plants or animals in population with another population, such as crosses between different breeds.
  • Stable Hybrid - term often used in gardening/horticultural. 
  • Hybrid species - a species evolving reproductive barriers against their own parent species.
Hybrids can occur through Plants, Mammals, Reptiles, Insects, Fish, and Birds. Examples of common hybrids are:
 - Sphynx Cat - a breed of hairless cat, created through selective breeding.
-Liger- a cross between a lion and a tiger.
-Mule- a cross between a donkey and a horse.

During our studies in this unit, I would like to look at real animal hybrids, as well as fantastical creatures in films, and their hybrids. I am going to study conceptual art and sculpture, as well as study anthropology and mythological creature books. I believe there is a high expectation when it comes to creating the hybrids, so I need to make sure that I am fully prepared and have completed extensive research, so that my hybrid is anatomically correct. 

Wikipedia (Hybrid) (no date) Available at: https://en.wikipedia.org/wiki/Hybrid_(biology) (Accessed: 27 October 2015).

Bald Caps Technical - Technical Folder

In our session with Sue, we looked at the application of bald caps. I have never done this before, so I was really excited and bought in my own bald cap to allow me to practice alongside her. I bought the Pre-Impression Bald Cap by Charles Fox, which is one of the most realistic. I was apprehensive about how it would turn out, as it was only my first attempt.

Heath and Safety:
-Cover client with a cape or towel, as you will be spraying the hair with water and using extensive amounts of gel.
-Make sure the work surface is clean and organised.
-Complete a client consultation.
-Check client for allergies and infections.

Products:
Pre-Impression Bald Cap
Water Spray
Strong Hold Hair Gel
Pin Tail Comb
Paddle Brush
Spirit Gum
Spirit Gum Remover
Scissors
Acetone
SupraColours
UltraFoundation
Translucent Powder

Method:

1. Prep the model's face. Do not moisturise, or leave any makeup on the face, as this will affect the bald cap sticking to the skin, so finish with toner.
2. Using a water spray, cover the hair in water to make it sleek. Brush through the hair with a paddle Brush.
3. Using the Strong Hair Gel, flatten the hair to the head. Section the back vertically into half.
4. With one half, fold it underneath the other half, and wrap around the head, behind the ear onto the top of the scalp.
5. With the other half, fold it around the other side of the head. You want the hair to become as round and as close to the scalp as possible, to keep the natural shape of the head.
6. Do not use pins or grips, as these will stick out, and can even puncture the bald cap. The hair has to be held with gel, or soap.
7. Baby hairs can be stuck back with a soap mixture.
8. Once the hair is stuck onto the head, ask your model to hold the front of the bald cap at the front of their head. At the back, lift and pull over the head, making sure that you do not pull the hair down.
9. Once the bald cap is in the right position on the head, begin to cut the cap to shape. Start by the ears, but do not pull the cap away from the face as this will distort the shape that you cut.
10. Cut around the ears, along the forehead and any excess from the back of the cap. Be careful when cutting, as it is better to have more cap than less.
11. Peel back the cap along the forehead, and apply the Spirit Gum to the cap and the head. Once tacky, gently roll the cap back down.
12. Press the cap down with a damp cloth, to make sure there are no ridges.
13. Once the cap is firmly stuck, use acetone to blend the edges. The acetone melts the cap away, blending it into the skin. Straight edges are more obvious to the camera than rounded uneven edges.
14. You can now begin to colour. Using the supra colours, mix white and red to create a baby pink. Using a sponge, dab this across the whole head. This will cancel out the hair colour underneath the cap.
15. Using the ultra foundation palette, use a sponge once again and dab all over the head.
16. With a large makeup pad, apply translucent powder to the head. The bad cap is now complete!

You can now use various methods to decorate the head, such as flicking the alcohol palette colours onto the head to create freckles, or making veins using the supra colours.


I am really pleased with the outcome of my first ever bald cap. I was surprised at how much it can change someone's facial features, in Becky's case, it makes her eyes much more prominent and blue. The use of a black towel to hold up behind the head made the shape of the bald cap clearer, and I could really see the shape of the head. There are many things I would change. I would like to have blended the front, in the centre of the forehead, a little more, as this kept catching on the light, making a small shadow which draws the eye to it. I found the sides difficult, as there was a ridge on both sides, but most difficult for me was the back, as it looked very saggy. This was the smallest size bald cap, but it was still big on the back, especially at the bottom of the neck. I focused on the front of the bald cap when colouring, as it was using up a lot of my product, but also because I could work on making it look more realistic. I think I matched the colour well and managed to cover up the hair colour underneath too. I am pleased with the outcome as I did find this task difficult, but I now know that if I am going to use a bald cap in my final images, I will only be taking images from the front and sides of the head, and maybe using a prop or costume to cover the back of the head. 


Reflection

Overall, I am pleased with the outcome of my first silicone prosthetic wound. What I have learnt during the project has been of great value to me, as I can use all of this knowledge in future, as I would like to go into the prosthetics/special effects industry. I have found this part of the project enjoyable, but stressful at the same time, due to the concentration of mixing the moulds, and not knowing whether the outcome will be useable. I am interested to continue on with this project, as I have many ideas for my human hybrid. Being able to create a creature that is a hybrid excites me, as there are no limits as to what we do, as long as it is a human cross species. The knowledge I have gained from the application and making of wounds is applicable to all different wounds, and also important when creating our hybrids, as we will also be using this method to create pieces for our hybrids. Things I would change if I were to complete a burn wound again, would be -
-Making sure I have taken all of the correct images of my burn. - I may have to redo my wound again to show images of it without the colouring.
-Changing the shape of my wound. - I think the wound could have looked more splattered onto the face like a liquid dripping down.
Altogether, I am proud of my final wound image, as I exceeded my own expectations as to what I could achieve.

After my Final Images..

After my final images, I thought it would be interesting to experiment with the wound, whilst it was still applied to my model. I thought about whether, after an acid attack, she would want to cover up the wound fully, trying to hide it with makeup as she's not comfortable with showing it. I then proceeded to cover the wound with foundation, to see what it would look like, if she tried to cover it. Thinking about a different scenario changed the wound completely.


 Using just a small amount of foundation changed the whole concept for me, as it looks like an older wound, but also enhances the idea that the victim is not comfortable with showing the bare scars. However, the burn's edges are more obvious to the eye, as the silicone picks up the product in a different way to the skin, as they are different textures. I prefer my first images as the wound looked more realistic and blended better, but I am glad that I got to experiment with the colouring to change the look of the wound. The burn looks better from further away in these images, because you can't see the edges of the silicone as clearly. I also think that the way the light catches on the top of the wound makes it look much better in terms of blending, but the shadowing at the bottom of the wound draws the eye's attention to it.

Before I applied any colour to the wound, I was supposed to take an image to show the wound by itself without any colour. I did not realise this, which is my fault entirely, but I managed to clean my wound after to show it without any colour. I think I will have to complete the wound again in an open session, as I think that the wound shown in the images has been stained with the colourants that I used on the day. From this, I know that it is really important to write a checklist down of what I have to have for the hand in, making sure that I tick all of these off.


Tuesday, 20 October 2015

Final Images - Technical Folder

Here are the images from my final look. I am really pleased with how the mould looks on camera, as you can hardly see the edges of the mould. I think the mould looks realistic, but I think if I were to revisit this look, I would create another mould of smaller acid burns to scatter them on the side of the face, which I think would look more natural and realistic. I am pleased on my first attempt of creating and applying my mould, and I have learnt a lot that I will have to think about next time, such as the use of petrolease, which created the small indents in the wound, which worked well for me this time, but if I needed a wound that was smooth, I would have to remake it. I feel the use of every-day makeup on the other side of the face makes it look as if she is trying to get back to her old-life before the attack, and the viewer sympathises with her. In a couple of the images, the shadow catches the edge of the mould, which makes it look stuck-on. The bottom image where the light is straight on the mould makes it look more realistic, as the wound blends seamlessly into the skin. If I were to do this wound again, I would change the shape a little, as if the acid dripped down her face. I would have liked to use gelatine and make the wound come further down the jaw, onto the neck. I would have liked the silicone wound to have come further up towards her eye, and maybe make another prosthetic to make it seem as if her eye was drooping, and reinforce this with a white contact lens to make it seem as if she was blinded in the attack. 


Makeup for my Character. - Technical Folder

After applying the wound and colouring it, I had to make up the rest of the face.

Health and Safety-
-Prep the skin, to create a good canvas for the makeup.
-Carry out a consoltation.
-Ask for allergies.
-Sanitise all products and brushes, as well as hands.
-Cover the client beforehand.

Products-
-Kryolan Foundation Palette
-Kryolan Translucent Powder
-Illamasqua Sculpting Duo
-Illamasqua Neutral Palette
-Kryolan Lip Palette
-Camouflage Palette
-Reflections Palette


Method- (This applies to the whole face but not the wound)
1. Prep the skin.
2. Apply a matching shade of foundation, focusing on the centre of the face using a foundation brush.
3. With a buffing brush, buff out the foundation to blend into the edges of the face. This gives a more natural finish.
4. Conceal any under eye areas or blemishes with the camouflage palette.
5. Apply Kryolan Translucent Powder over the face.
6. With the Sculpting Duo Palette, apply a small amount of darker powder just underneath the cheekbones, using an angled contour brush.
7. Apply the highlighter with a highlighter brush to the higher points on the face, the jaw line, the cheekbone, the chin, nose, cupid's bow and forehead.
8. Using the reflections palette, and a small shadow brush, apply the creamy base to the whole lid. This will make the shadow stick and appear more pigmented.
9. Apply the brown from the neutral palette to the outer corner of the eye, and around the socket. This will make the client's eyes stand out more. Deepen this with the black shadow.
10. Fill in the brows with the brown from the neutral palette, and brush into shape. Finish with a highlight under the brow on the bone.
11. Apply the desired lip colour to the lips, using a small flat brush. Working your way from the corners of the mouth and up to the cupids bow creates a cleaner line.


I am pleased with the makeup completed for around the wound. I was conscious of not making the makeup too dark, as I believe the victim of an acid burn would not like to venture out of her comfort zone for a while, and not use a drastic look. I feel this works well with the wound, and makes the wound a little more shocking as she turns and reveals it on the other side. 


Applying The Wound - Technical Folder

When it came to taking the wound out of the mould, I was very apprehensive, as I did not know how well the mould came out. I was nervous to see whether I would have to create a new one, and start all over from scratch again.

Health and Safety
-Clean all surfaces and prepare your workspace. 
-No cross contamination. 
-Wear gloves when handling mixtures. 
-Wear a breathing mask if holding silicones or spraying moulds. 
-Hair up. 
-No jewellery.
-Cover client with cape. 

Products
-Talcum Powder
-Laminating Brush
-Pros-Aide
-Pro Clean Remover
-Barrier Cream
-Baby Buds
-Isopropyl Alcohol. 
-Neill's Colour Palette
-Supra Colours


Method
1. Clean the skin. Any products used before applying the wound will affect the application of the wound. You will make up around the wound after it is applied. 
2. With the mould, use talcum powder and a laminating brush to clear bald ease mix away from the mould. The talc removes the stickiness from the mould and gives you a matte finish, as well as making it easier to remove. 
3. Apply Barrier Cream to the site where the wound is going to be.
4. With a Baby Bud, apply Pros-Aide first to the wound, set aside and apply to your model. Pros-Aide is a contact glue, which means the glue bonds to itself. You apply the glue to the wound first, as it takes less time to dry on the model due to body heat. Make sure all of the edges are covered, and that when you set it aside the edges do not fold back on themselves. 
5. Apply the wound to the skin, press hard all over, to make sure the glue has set. 
6. Using baby buds and Isopropyl Alcohol, blend the edges of the wound. The Baldease mixture is melted away by the alcohol. 
7. You can now begin to colour the moulds. 
8. Using Neill's Colour Palette, which reacts with alcohol, use a flicking motion to create the mottled texture of the skin. Using this technique will achieve a more realistic skin tone, as you can capture all of the different colours that are in the skin. 
9. Work into the wound. I used blue, yellow and red tones to create depth and highlight. I didn't have to colour the whole of my mould as it was already similar to that of my model's, Lucy. 
10. I blended the colour away from the wound, to make the wound look more realistic, and less like it was just plonked onto the face. 
11. Once you are satisfied with the colouring of your mould, you can now concentrate on the rest of the face. 


Altogether, I was really pleased about the application and colouring of my mould. I was quite nervous at the beginning of the session, but towards the end I gained confidence. When I first took my wound out of the mould, I found that it had many small indents in it. I was confused, as the other side was very smooth. I believe that I had applied too much petrolease before pouring the silicone in, which left little air-like bubbles. Overall, this benefitted my look, as it made the skin look porous and fizzled away. I spent a lot of the time blending my wound, I think if I didn't focus on the blending as much as I did, that the outcome wouldn't look as realistic. I was thorough in checking if my piece was glued on properly, which also benefitted me as the Baldease did not start to peel when blending. I found, instead of rubbing away the wound from side to side, using an up and down movement produced a better outcome. When it came to colour, I did not need to colour over my mould, as it was already very similar to my model's, Lucy. I began by using the normal paintbrush technique and painting the colour on, but this made the mould look fake and unrealistic. Kat then helped me, to show me how to use the flicking method, where the paint would slowly build up a colour. This produced a more realistic colour and tone of the skin. After I was happy with the overall skin tone of the wound, I then worked into the indents, making them seem deeper with darker tones. Using a range of tones made the would look more natural. Through just one application and colour, I have learnt many things about keeping the mould looking as realistic as possible. I am pleased with the outcome of the wound and the application. 


Creating my Character

When designing my character, I was unsure of how to show her. I knew my character had been the victim of an acid attack by an ex-partner, and that the wound was going to be around 6 months old, but I didn't know whether she would have attempted use makeup to try and cover the burn, or whether she would have even been using makeup at all. So I decided to create two face charts to show my ideas.

FaceChart 1-

This is my first idea of my character. I have decided that she would have used makeup. She has decided to use makeup deviate the eye from the burn, so that people will not stare at her. She wants to look like she used to, so in an attempt to do this, she has used makeup. When the viewer looked at my character, I wanted them to look at her and think 'she's pretty', then see the burn, to provoke an emotional response from the viewer. This girl has been disfigured for the rest of her life, and looking at her on one side of the face, she looks like every other girl, but on the other, you can clearly see her scars. I want the viewer to be educated of acid burns, and also sympathise with the character. For this look I chose a classic smokey eye, with a subtle lip and contour, as these are very fashionable with women during this time, especially with celebrities such as Kim Kardashian sporting these looks every day. I then thought about whether she would have tried to conceal the burn with foundation, but thinking about the scientific side of it, she wouldn't be allowed to put anything on it because it is still healing. This also adds effect to the shock of seeing the scar for the viewer.


FaceChart 2-

This is my second face chart that I created for my burn victim. I decided for this character to not have used foundation. To contrast the idea of face chart one, I think the girl would not feel comfortable to go out into society. As acid attacks have a negative effect on not only the physical side but the psychological side, I think she would be too nervous to be in public. I would use a natural foundation base, but enhance her bags under her eyes, as I believe she would not be sleeping well, dreaming of the attacks. 


Looking back at these face charts, I would like to create number one, but also combine other ideas. I will complete my look from face chart one, then I will cover the scar with foundation, as if she is trying to conceal it. I would like to see how this changes the look, and changes the impact on the viewer. I am excited to create my look, but also very apprehensive, as I do not know how it will go. 


Katie Piper

Katie Piper is a television presenter and former model. At the age of 25, she was the victim of an acid attack. Piper was born in 1983 in Hampshire, aspiring to become part of the fashion world, looking up to her father, a barber. She became a beautician, then aimed to be a model. She took part in promotional, glamour and fashion photography shoots, and also starred in programmes such as 'Ashes to Ashes' as an extra. In 2006, she came the 2nd runner-up in Miss Winchester Beauty Pageant. Her career began to take off, she featured in international newspapers, and people were beginning to know her name.
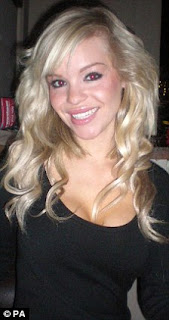
Katie Piper, before the attack. 

In 2008, Piper was to be in 'Candy Crib', a reality television show, where models had to live in a house in an unknown location, each week being voted off by the public. A few months prior to this, Piper was contacted on social media by a man named Daniel Lynch, a martial arts expert, who she believed to have more substance than the men who usually tried to contact her. They arranged to meet at an event Katie was working at, where for the first time they met. Lynch seemed laid-back, and they agreed to keep in contact. After many messages being sent back and forth, he asked her on their first date, Katie suggesting London's Comedy Club. The date went well, with Daniel escorting Katie to the toilets during the interval, seeming chivalrous. They began to meet up more, when Daniel's text messages and emails started to become overwhelming for Katie. During one outing, Lynch lost his temper over a stall-holder calling Katie (darling), this is where Piper started to become concerned. When they weren't together, Lynch would send multiple messages to Katie, demanding to know where she was. One time, Katie counted 37 messages in a couple of hours. Her flatmates too became concerned, but Piper still continued the relationship, believing in him. In their second week of their relationship, Daniel wanted to buy both himself and Katie matching trainers, but when the assistant bought out a pair that seemed scuffed, Lynch went into meltdown, hurling abuse at the shop assistant. Katie now started to doubt that her new boyfriend was who he initially seemed to be. At the end of the day, Katie would tell him she didn't want to continue their relationship any longer.

That evening, Daniel and Katie decided to stay in a hotel for the night, as it would be closer to the hairdressers that Katie had an appointment for the next day. In the lift, Katie knew she was in trouble, as Lynch snarled 'You're not even all that in the flesh, are you?'. Once in the room, Katie was subjected to verbal abuse, then thrown across the room by Lynch. She hit her head on the door, and blood seeped out, but before she knew it she was falling in and out of consciousness. Lynch threw her on the bed, when he then raped her. After the ordeal, Katie rushed to the bathroom, where Lynch attacked her a second time, threatening her first with a disposable razor, then attaching a belt to the sealing and threatening to hang her. She managed to persuade him not to, and they both left the hotel together, Katie, too scared to run. He stopped at a mobile shop, as he had smashed Katie's in his rage, and bought her a new one so he could contact her. On dropping her home, he told her he would kill her and her family if anyone found out. Katie hurried back into the safety of her flat, where she told her flatmates and needed to be taken to hospital, although she was too scared Daniel would still be outside. He called her multiple times, shouting abuse and demanding to know where she was. She was treated at the hospital, and discharged the same day. She knew if she stayed in the flat she would be safe until she would be going into the Candy Crib, in a couple of days.

Two days after the initial attack in the hotel, Katie was called by Lynch, who told her to look at her email, as he explained all of his actions in it. Her internet was down, and Lynch suggested she go to a coffee shop down the road. She agreed, with Lynch calling to know her where abouts all of the time. Whilst on the phone to him, outside the coffee shop, Piper was approached by a hooded figure, a cup outstretched in his hands. She believed he was a  homeless man, so reached into her bag to get some money, still on the phone to Lynch, when she was covered in liquid. She was confused as to what happened, when she felt the sharp burning slowly covering her body. Lynch stayed on the phone, listening to her screams. She ran into the coffee shop, desperate for help, throwing water on herself, and even flushing her face in the toilets. The customers quickly went to help, and sat her down, waiting for the ambulance to arrive, which took an hour. Katie lost consciousness, waking up thinking she was dead. In the hospital, Katie was questioned by the police who found the acid-thrower, Stefan Sylvestere, after he had splashed acid onto himself in the attack too. She was scared for her life, and told the police about Lynch. Katie suffered third degree burns all over her face, neck chest, and the acid had burned her oesophagus after she had accidentally swallowed some during the attack.
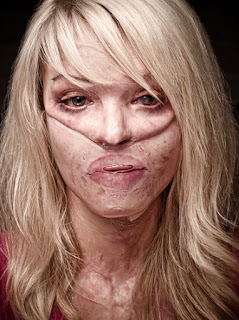
Katie Piper, during her recovery.

Katie was put into an induced coma for 12 days. 40 operations were carried out to build the foundations for skin grafts, removing the dead and burned skin. She moved back to Hampshire, where her mother left her job at a school to care for her daughter. Katie had to wear a mask for 23 hours of the day, to flatten the scars and keep in the moisture. Katie has been left permanently disfigured, blind in one eye, and forced to eat through a feeding tube due to her oesophagus being burnt.

Katie gave up her anonymity in 2011, and told her story through Chanel 4's 'Cutting Edge' series, in an episode named 'Katie: My Beautiful Face'. This was shown to 3.5 million viewers, and was greatly received. Katie then founded 'The Katie Piper Foundation', a charity who aims to help fellow victims, and show the world that scars do not limit a person. This was supported by Simon Cowell, who is patron of the charity. Katie Piper's career has continued building, as she has created many TV shows focused on helping people. It is outstanding that throughout all of this, Katie is still a true philanthropist. She has written 3 books and an autobiography.
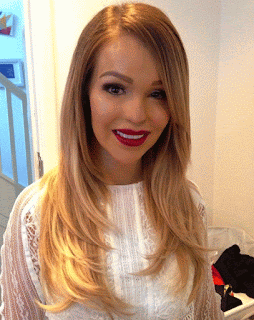
Katie Piper, after her recovery.

She has since become engaged and had a baby daughter, Belle.

Katie Piper, with daughter Belle.

Learning about Katie's life has further developed my research into acid burns. To learn about an individual's story like Katie's, educates you, and gives you an insight into their experience. By watching the documentaries that Katie has produced, and reading parts of her books and autobiography, put me in her shoes, you see her story in such more of an emotional view, compared to that of the media. 

Channel 4’s Cutting Edge (2009) Katie Piper: My Beautiful Face. .
Piper, K. (2015) Beautiful Ever After. United Kingdom: Quercus Publishing.
Piper, K. (2011) Acid attack victim: I heard a horrible screaming sound... it was coming from me. Available at: http://www.dailymail.co.uk/femail/article-1351435/Acid-attack-victim-Katie-Piper-attacked-going-boy-met-Facebook.html (Accessed: 20 October 2015).


Tuesday, 13 October 2015

Making My Mould - Technical Folder

In our third practical session with Sue and Kat, we began to make our moulds. This was very daunting as they stressed the fact that there should be no cross contamination at all, as well as the fact that we had to make the measurements of both Silicone A and B the same. 

Health and Safety
-Any aerosol sprays need to be sprayed out the window.
-Hair tied up.
-No jewellery.
-New change of gloves after handling products.
-Old clothes.
-Lids on tightly.
-New spatula for each product.
-Wipe down each pot after using it to reduce cross contamination. 
-Wear Breathing mask when using the products.
-NEVER pour silicone down the sink.

Products
-Clay Sculpture
-Cups
-Silicone A
-Silicone B
-Deadener
-Spatulas
-Scales
-Fixing Spray
-Petrolease
-Glue Gun
-Scissors
-Baldease
-Isopropyl Alcohol
-Colour Pigment
-Tuppawear 
-Tissue
-Babywipes


Method
1. Begin with making sure work surface is covered with cling film, you are wearing gloves and you have spare tissue/babywipes at the ready.
2. Wearing your mask, spray the clay sculpture with Fixing Spray all over, about 20cm away. 
3.Once the Fixing Spray is dry, spray Petrolease over the sculpture.
4. Cut the bottom off a cup, then glue with a glue cup around the sculpture. Make sure there are no gaps for the silicone to seep through.
5. Take a separate cup, new gloves and wear your breathing mask. Label 2 wooden spatulas A and 2 B.
6. Using the scales, measure out 30g of Silicone A, using the spatula labelled A to measure out. It is more precise with a spatula than to pour. 
7. Once you have the correct measurement, screw the lid on tightly, wipe down the sides of the pot with baby wipes and change to new gloves. 
8. Measure out 30g of Silicone B using spatula B. Wipe down sides and screw lid tightly.
9. Now mix the two substances together, gently to lower the amount of air bubbles. You can use either spatula now they are being mixed. To get rid of air bubbles, tap cup on the side.
10. Pour the mixture over the clay sculpture, pouring back and forth covering the work. Throw empty cup away.
11. Wait at least an hour until the silicone has set.
12. Take the mould out of the cup, and wipe down with isopropyl alcohol.
13. Once again, spray petrolease all over the mould.
14. Make a mixture of Baldease and Isopropyl Alcohol together.
15. With a brush, brush the mixture over the mould, and let dry. (To quicken this up you can use a hairdryer).
16. Apply another layer of mixture over the mould, making sure all the intricate bumps are covered, and let dry.
17. Mix 8g of Silicone A, 8g of silicone B and 12g of Deadener into a cup. To work out the measurement of deadener, it will be 60% of the two A+B numbers added together. Change gloves between. The Deadener gives the fleshy feel to the mould. 
18. In the mixture, mix in the liquid pigment. This is really strong, so a couple of drops is enough. Make up the desired colour to match the model's skin.
19. Pour this mixture into the mould.
20. Scrape over the mould with the straight metal ruler-like tool, to even out the bottom of the mould. 
21. Use a baby bud an Naphtha to remove the excess silicone around the mould. 
22. Leave to dry.


I really enjoyed this process, as it was the first time I had done it, but it was nevertheless a stressful experience. I managed to complete the process without messing up my measurements, which I found to be the most difficult in getting them both equal. I think my mould went well, although I was worried about the fact that you can see the mould behind the piece in the image above, as if it is not thick enough, but Sue said that it will be fine and that I can make this look sore and if I wanted to, fill it with blood. I am excited for the next part of taking the piece out of the mould and applying it, but for now need to develop my character.

Zoriah

When researching acid burns and it's victims, I came across photojournalist Zoriah Miller, or just Zoriah. Born in America in 1976, he is a photojournalist that focuses on war torn areas of the world. His work contains a sense of raw honesty that many photographers cannot capture, provoking many thoughts and emotions from the viewer. His love of photography started when he was just 15 years old, when he won a national award for one of his photographs. He began to travel, taking his camera with his at all time. During one of his expeditions, he had all of his equipment stolen, leading him to have to stay overnight in a homeless shelter. This set him back so far, that he almost gave up his passion of photography. He left the country, graduating college and moving to New York, to become part of the music industry, which didn't take off as much as he'd hoped. Following this knock back, he became absorbed in humanitarian aid, once again going abroad, to study disaster management. He wanted to capture all of this to educate people on the conditions, and the people who were living in the centre of it. Zoriah picked up a camera and the rest is history. He puts himself in hundreds of dangerous situations in Asia and Africa, focusing on the war-torn countries, hoping to educate those back home. He has missed death three times during his career, including being shot at by soldiers in Israel.
On a trip through Bangladesh, he learnt of the horrific acid attacks on men, women and children, that occur many times a year. Many of these women were attacked because they turned down a marriage proposal, and the men because of land disputes. Zoriah created this series of photographs for the non-profit charity, The Acid Survivors Foundation, which he believes makes the most difference to these people. The charity focuses on teaching communities that it is not the victims fault, that the attacker is the one in the wrong. They work alongside the government to push the laws, and find justice for the victims. These people now have to work for something that never needed to be taken from them, their whole lives are devastated and the trust work towards showing their communities this. Zoriah was invited into the homes of victims, learning about their lives, their families and the incidents. He does not disclose the names of the victims, which to me, makes a bigger impact as it seems as if there are too many names for him to include, showing the severity of these attacks. These photographs not only raise awareness for Acid Attacks in Bangladesh, but all over the world. They provoke strong emotions from the viewers, which is why I am going to include the whole series of photographs.

Warning: Graphic images


All images by Zoriah Miller.

These photographs capture such dramatic detail, they are extremely raw. The victims sit in front of the camera, without posing, without pretending they are something they are not. The plain, black background leads all of the focus onto the victims, their clothing, their expressions, and most importantly their wounds. These are undeniably graphic images, but this, I feel, startles the viewer, into realising that this is not makeup, but real wounds. Some of the victims are blind, some facially disfigured, some severely disabled. It is rare to find any images on the internet of acid burns that contain so much detail, that you can clearly see the wounds, the textures, and the disaster that the acid  has caused these victims. I feel this reinforces idea that we are shocked by the images, because we don't see this side to countries. The Western world has fewer attacks than in the East, where the communities are not educated about Acid Attacks. I feel that the UK does not educate our society about acid attacks enough, but our media allows it to be shown to the public. In places like Bangladesh, the victims are led to believe it is their fault that they have been attacked, with little to none media coverage. This series of photographs focuses on provoking human emotions, but also the dehumanisation of people. The idea that people can cause this amount of suffering purposely to people shocks me, and causes me enormous disbelief in the human race. I find this set of images very emotional and thought provoking, which I am hoping to do with my wound. 


Interview with Zoriah Miller (2010) Available at: http://petapixel.com/2010/06/03/interview-with-zoriah-miller/ (Accessed: 13 October 2015).
Miller, Z. (no date) ‘Acid Attack’, Available at: http://www.zoriah.net/blog/2013/04/acid-attack.html (Accessed: 13 October 2015).