Sunday, 29 November 2015
Bibliography
Bibliography
7 interesting facts about Atacama desert in Chile (2010) Available at: http://www.traveladvisortips.com/7-interesting-facts-about-atacama-desert-in-chile/ (Accessed: 17 November 2015).
A1 Savannah (2014) A1 Savannahs pricing. Available at: http://www.a1savannahs.com/cats/savannah-pricing (Accessed: 10 November 2015).
ADNAN, M. M. and profile, V. my complete (no date) Medical Dictionary Search here. Available at: http://medicinembbs.blogspot.co.uk/2011/08/injury-due-to-heat-and-electricity.html (Accessed: 6 October 2015).
Acid throwing (2015) in Wikipedia. Available at: https://en.wikipedia.org/wiki/Acid_throwing (Accessed: 9 October 2015).
Acute Sunburn Picture Image on MedicineNet.com (2015) Available at: http://www.medicinenet.com/image-collection/acute_sunburn_picture/picture.htm (Accessed: 6 October 2015).
America, P. of (2012) ‘Sign Up’, 5 June. Available at: http://www.puppeteers.org/2012/06/05/stories-from-the-ground-shadow-puppetry/ (Accessed: 6 October 2015).
Arctic (2015) in Wikipedia. Available at: https://en.wikipedia.org/wiki/Arctic (Accessed: 17 November 2015).
Association, C. F. (2009) Breed profile: The Sphynx. Available at: http://cfa.org/Breeds/BreedsSThruT/Sphynx.aspx (Accessed: 4 November 2015).
Association, P. (2015) ‘Two men and a woman arrested after acid attack on Carla Whitlock’, The Guardian, .
Austern, L. P. (2005) Music of the sirens. Edited by L.P. Austern and Inna Naroditskaya. Bloomington, IN: Indiana University Press.
BBC and Attenborough, D. (2010) Life In Cold Blood - The Cold Blooded Truth. Available at: http://www.bbc.co.uk/programmes/p0060tnq .
Barrow, J. (no date) The original Harry Potter creature concept art is utterly breathtaking. Available at: http://www.buzzfeed.com/jobarrow/the-original-harry-potter-creature-concept-art-is-utterly-br#.uirNQwN39y (Accessed: 12 November 2015).
Brouhard, R. (2014) 10 Examples of Second Degree Burns. Available at: http://firstaid.about.com/od/burninjuries/ss/10-Examples-of-Second-Degree-Burns.htm (Accessed: 6 October 2015).
Burns: Types, Treatments, and More (2014) Available at: http://www.healthline.com/health/burns#Overview1 (Accessed: 4 October 2015).
Burns and Electric Shock-Topic Overview (no date) WebMD, .
Cartwright, M. (2012) Centaur. Available at: http://www.ancient.eu/centaur/ (Accessed: 10 November 2015).
Channel 4’s Cutting Edge (2009) Katie Piper: My Beautiful Face. .
Choices, N. (2015) Skin cancer (non-melanoma) - NHS Choices. Available at: http://www.nhs.uk/Conditions/Cancer-of-the-skin/Pages/Introduction.aspx (Accessed: 6 October 2015).
Coming Soon (2005) Interview with Narnia special effects and makeup team - Narnia movies, C.S. Lewis, and more - the stone table. Available at: http://www.thesecrethill.com/articles/206,1.html (Accessed: 12 November 2015).
Fresno teenager burned in home fire ready for high school graduation(2015) Available at: http://www.fresnobee.com/news/local/education/article23623696.html (Accessed: 6 October 2015).
Fruit Acid Can Soothe Sunburns (2015) Available at: http://www.vsparussellville.com/fruit-acid-can-soothe-sunburns/ (Accessed: 4 October 2015).
Gallagher, B. (2008) Go skin-deep with the makeup effects of ‘The chronicles of Narnia: Prince Caspian’. Available at: http://movieweb.com/go-skin-deep-with-the-makeup-effects-of-the-chronicles-of-narnia-prince-caspian/ (Accessed: 12 November 2015).
Grizzly–polar bear hybrid (2015) in Wikipedia. Available at: https://en.wikipedia.org/wiki/Grizzly–polar_bear_hybrid (Accessed: 4 November 2015).
Harry Potter Wikia (1996) House-elf. Available at: http://harrypotter.wikia.com/wiki/House-elf (Accessed: 12 November 2015).
Hawke, C. (2005) ‘A “Wholphin” is born’, CBS NEWS, .
Horror Film Countdown: Nosferatu (1922) (2014) Available at: http://non-productive.com/blog/horror-film-countdown-nosferatu-1922/ (Accessed: 7 October 2015).
Hot Water Scalding (2015) Available at: http://www.healthcentral.com/encyclopedia/hc/hot-water-scalding-3168861/ (Accessed: 6 October 2015).
Interview with Zoriah Miller (2010) Available at: http://petapixel.com/2010/06/03/interview-with-zoriah-miller/ (Accessed: 13 October 2015).
IvyMikeCafe (2015) What to do when people are on fire. Available at: http://griddownmed.com/2015/04/18/burns/ (Accessed: 6 October 2015).
KALAHARI DESERT FACTS (no date) Available at: http://interesting-africa-facts.com/Africa-Landforms/Kalahari-Desert-Facts.html (Accessed: 17 November 2015).
Kamolz, L.-P. (2014) Handbook of burns. Vienna: SpringerWienNewYork.
Kiri Seraphi (2012) Making of Mr.Tumnus(from Japanese DVD). Available at: https://youtu.be/ncKfRtxqzZ4 .
Messy Beast (1915) Hybrid equines. Available at: http://messybeast.com/genetics/hybrid-equines.htm (Accessed: 10 November 2015).
Miller, R. (2007) Digital art: Painting with Pixels (exceptional social studies titles for upper grades). Minneapolis: Twenty-First Century Books (CT).
Miller, Z. (no date) ‘Acid Attack’, Available at: http://www.zoriah.net/blog/2013/04/acid-attack.html (Accessed: 13 October 2015).
Mother Nature Network (2015) 11 amazing hybrid animals. Available at: http://www.mnn.com/earth-matters/animals/photos/11-amazing-hybrid-animals/zebroids (Accessed: 10 November 2015).
Mother Nature Network (2015) 11 amazing hybrid animals. Available at: http://www.mnn.com/earth-matters/animals/photos/11-amazing-hybrid-animals/wholphins (Accessed: 10 November 2015).
NatGeoWild (2014) Blood shooting eyes. Available at: https://www.youtube.com/watch?v=xodVcgJ8bc0 (Accessed: 17 November 2015).
Phrynosoma solare (regal horned lizard) (no date) Available at: http://animaldiversity.org/accounts/Phrynosoma_solare/ (Accessed: 17 November 2015).
Piper, K. (2011) Acid attack victim: I heard a horrible screaming sound... it was coming from me. Available at: http://www.dailymail.co.uk/femail/article-1351435/Acid-attack-victim-Katie-Piper-attacked-going-boy-met-Facebook.html (Accessed: 20 October 2015).
Piper, K. (2015) Beautiful Ever After. United Kingdom: Quercus Publishing.
Preece, R. (2012) The door to hell: Take a look inside a giant hole in the desert which has been on fire for more than 40 YEARS. Available at: http://www.dailymail.co.uk/sciencetech/article-2179622/The-Door-Hell-Giant-hole-Karakum-Desert-40-YEARS.html (Accessed: 17 November 2015).
Principal deserts of the world (2015) Available at: http://www.factmonster.com/ipka/A0778851.html (Accessed: 17 November 2015).
Revenson, J. (2014) Harry Potter - the creature vault. United Kingdom: Titan Books.
Rickitt, R. and Harryhausen, R. (2007) Special effects: the history and technique. New York, NY: Billboard Books.
Rosen, B. (2009) The mythical creatures bible: The definitive guide to legendary beings. United States: Sterling Publishing.
Rowling, J. K. (1999) Harry Potter and the chamber of secrets. London: Bloomsbury Publishing PLC.
Rowling, J. K. (2003) Harry Potter and the order of the phoenix. 1st edn. London: Bloomsbury.
Tenable, J. (2013) Fauns and Faun mythology. Available at: https://wizzley.com/fauns-and-faun-mythology/ (Accessed: 12 November 2015).
The Cattle Site (no date) Breeds - Beefalo. Available at: http://www.thecattlesite.com/breeds/beef/97/beefalo/ (Accessed: 10 November 2015).
The Karakum desert (2010) Available at: https://blacksandsfilm.wordpress.com/the-karakum-desert/ (Accessed: 17 November 2015).
Theseus and the Minotaur (no date) Available at: http://myths.e2bn.org/mythsandlegends/textonly563-theseus-and-the-minotaur.html (Accessed: 10 November 2015).
Third degree burn caused by gas fire - Stock Image M335/0129 - Science Photo Library (no date) Available at: http://www.sciencephoto.com/media/265680/view (Accessed: 6 October 2015).
Vinther, J. (2003) Special Effects for Film and Theatre. 1st edn. New York, NY: Routledge Member of the Taylor and Francis Group.
Wikipedia (Hybrid) (no date) Available at: https://en.wikipedia.org/wiki/Hybrid_(biology) (Accessed: 27 October 2015).
mlbradford (2015) Posts about Ray Harryhausen on Bradscribe. Available at: https://bradscribe.wordpress.com/category/ray-harryhausen/ (Accessed: 7 October 2015).
thegabytzu97 (2012) Harry Potter and the deathly Hallows - part 1 - extras - creating Dobby and Kreacher. Available at: https://youtu.be/PglEreDggB8 .
Technical Evaluation
I have really enjoyed the technical sessions in the Special Effects Unit, and I am gutted that we are not carrying forward the option through to next semester. I think that my technical skills have advanced massively, as I am very new to Special Effects, and as initially very nervous about it. I think that I have listened well to instructions and taken notes on all of the processes, including sculpting, making the silicone moulds, filling our moulds, applying our moulds and the colouring our moulds. For me, the most difficult part was the making of the silicone moulds, as there was a lot of pressure on us to make the moulds correctly, and not waste any of our silicones. I did not realise how intense the actual making of the moulds would be, and that you had to have the exact amount of both Silicone A and Silicone B to make a successful mould, but I am happy that we have been taught how to make flat moulds, rather than just learning how to apply them. It was quite daunting learning about the silicones themselves, and the safety behind them, such as not cross-contaminating as this can ruin the silicones and make them unusable. The Health and Safety is very similar to that of normal makeup application, but have more serious outcomes if you do not follow the rules, such as causing damage to the lungs if you do not wear the breathing masks when spraying the Petrolease and Fixing Spray. I liked how we learnt about the products themselves and why we use them, such as the Prosaide being a contact glue, as I would not have known that otherwise. I feel that learning all about the Special Effects has benefitted me in the long run, as it is something that I am seriously considering when thinking about my future in the industry. I have enjoyed this unit, and would have liked to have advanced this a little more.
Brave New World Evaluation
I have really enjoyed the Brave New World Project. I think it has been 100% beneficial to me, as I have learnt what goes into creating creature character makeup. I have overcome challenges, and think I have tried my hardest to create a realistic character that is correct to the Regal Horned Lizard. I think that my time management has been much better than last year, as I have been updating my blog as I complete my research. I have tried to dedicate certain days to the Special Effects Unit, so that I can concentrate wholly on this unit. I think that this project has demanded a lot from myself, as I have strived to create an original design that was different to everyone else's. I think that what I have found most difficult was finding an animal or concept that I wanted to combine into a hybrid, and starting my research. I think that this was such a big project, that there was a big strain on myself to find an idea, as there were so many options. The project undeniably went a lot quicker than I was expecting, which makes me much more prouder that I was able to create such a detailed look and complete all of my research in time. I think that I definitely challenged myself when it came to my design, I wanted to make intricate designs and larger pieces to really convert my human into a real hybrid. I think that I thought deeply about my idea, and everything that I included in the final look I had thought about. When it came to the research, I was inspired by the bald cap technical that I had completed, particularly the application of fuller's earth on top of it. I thought about the textures it created, and found a resemblance to the textures of the earth in the deserts. I then looked at the conditions of different types of deserts, as well as all that inhabit them. I knew that I wanted to make reptile skin for my final piece, so explored the more interesting types of lizards that lived in these conditions. I came across the Horned Lizard and my idea was created. I think the progression of my idea flowed into one another, and all linked to each other. I am gutted that the unit does not continue into the next semester, as I think I could have really developed in Special Effects. I think it would be interesting to maybe have been split into groups in our class, on who wanted to specialise into what part, such as the sculpting, making the moulds, applying and colouring. I think it was be beneficial for the class to be able to see how it works out in the industry, as not one artist completes the whole look. I think that Special Effects will be included in my Final Major Project, as I have enjoyed it so much, and really would like to develop my abilities, as well as conquer challenges. I am happy that I challenged myself in this project, and although I was not particularly happy with some aspects of my final look, I have exceeded my expectations, as I never would have thought I would have been able to complete such a complicated look.
Hybrid Assessment Evaluation
Overall, I am pleased about how my Hybrid Assessment went. I am really pleased with the final look, even though I came across many challenges on the day. Firstly, I know that by misplacing my bald cap I could have been in a lot of trouble if it weren't for the support and helpfulness from another student and my tutor. As I went to the Prosthetics event a couple of days before the assessment, in theory I could have bought a replacement bald cap there, but I was silly enough not to check, because I was sure I had another one. This alone has taught me that I need to check I have the right products at least a week before practice or final looks. Looking back, I am pleased I wasn't getting wound up and stressed during the assessment, I think this is due to the fact that I have really enjoyed making up the prosthetic pieces and I wanted to see how they were going to turn out when applied to the face. I think that the front panel on the forehead was my favourite part of the look, as I had individually placed each of the scales into the mould, to make the piece a lot more 3 Dimensional. I was pleased with my second bald cap that I completed completely on my own, I managed to look back on my first and blend the areas more in the second, making the bald cap seamless. I particularly liked the way the horns went onto the bald cap, and my choice of covering the bald cap, I did not just paint it but I experimented with using different textures to create different effects. I think I may have rushed the colouring a little, as I was worried about timing but also became increasingly tired as the look went on, as it took me about 5 hours to complete fully. I think that I should have taken a bit of a break and came back to the look, but I was conscious about how my model was feeling, and ultimately I just wanted to see final outcome. I think this is something I am going to have to work on, but looking back I know where I went wrong. I am not disappointed with the colour, but feel I could have done a lot better particularly on the back of the head and the arms. I was conscious of the fact one of the horns kept falling off the head, I think was due to the fuller's earth not drying on the base, as there was a leak coming out of the bald cap where I had wet the hair down, and the water was gathering at the bottom and leaking out. I think that next time, if I were to do the look again I will definitely be gluing down the horns before the fuller's earth. I didn't this time mainly because I didn't want the fuller's earth to cover too much of the horn, and make them look smaller. I would love to do a look like this again, and will definitely be investing in the products to practice by myself.
Friday, 27 November 2015
My Hybrid Final Images
Here are some of my favourite images from my final shoot.
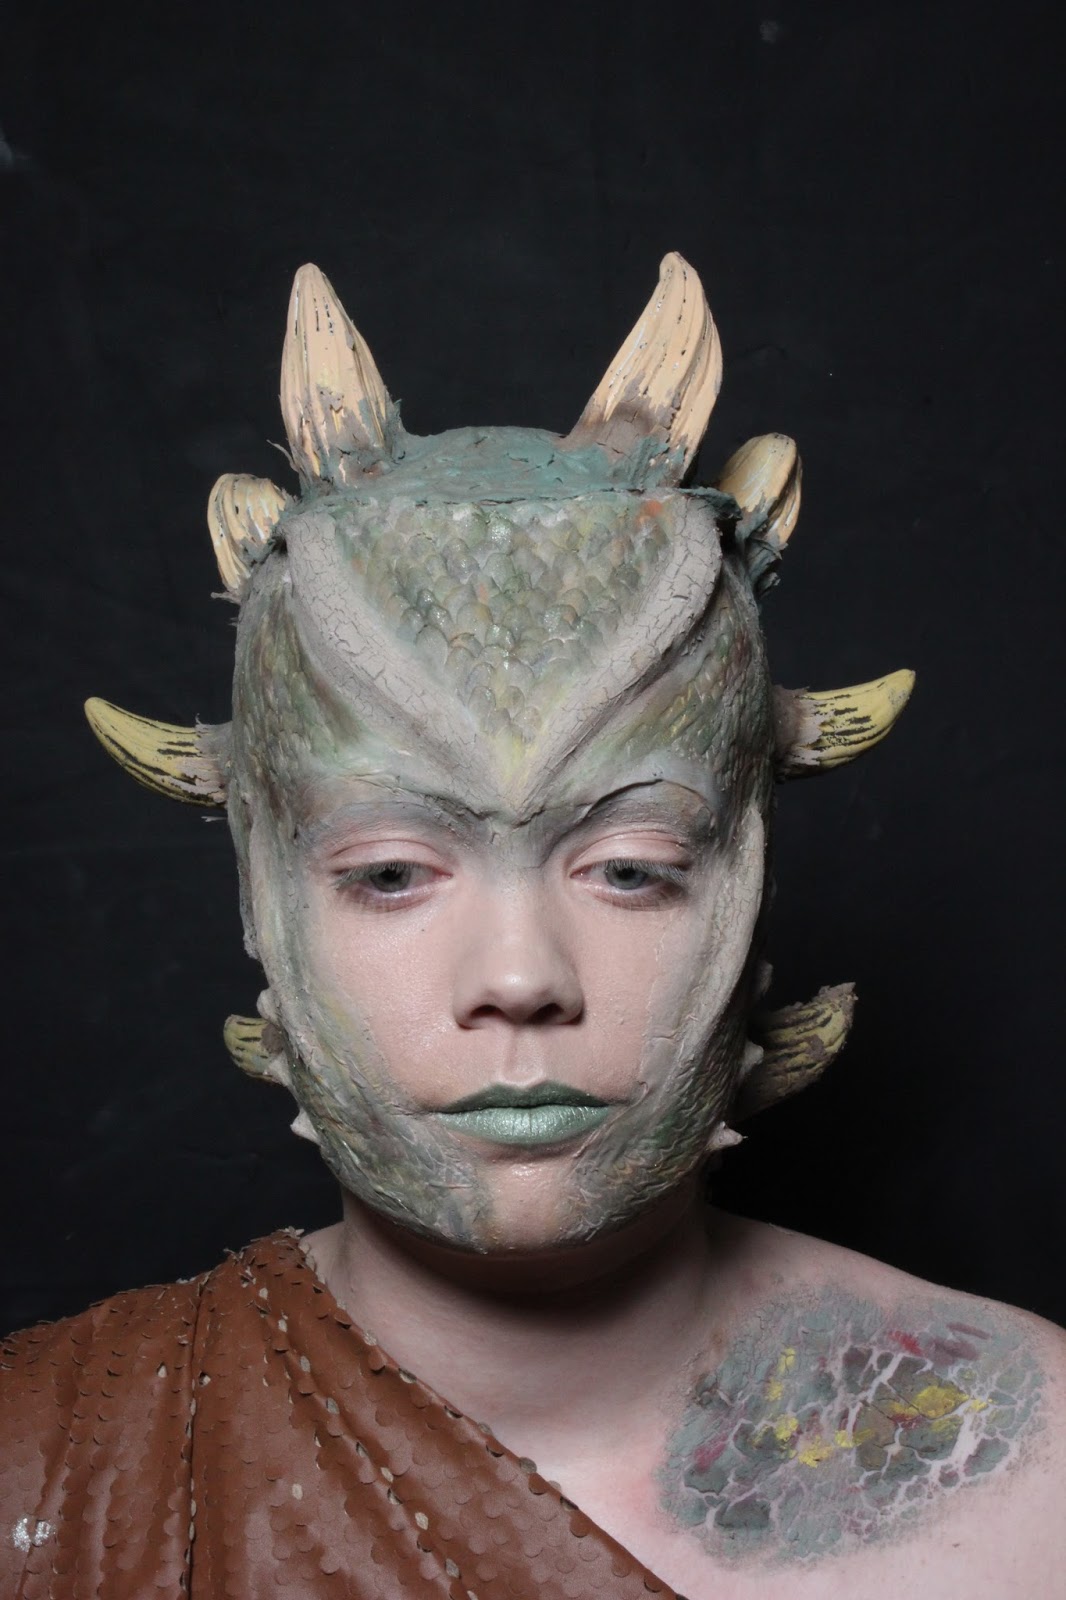
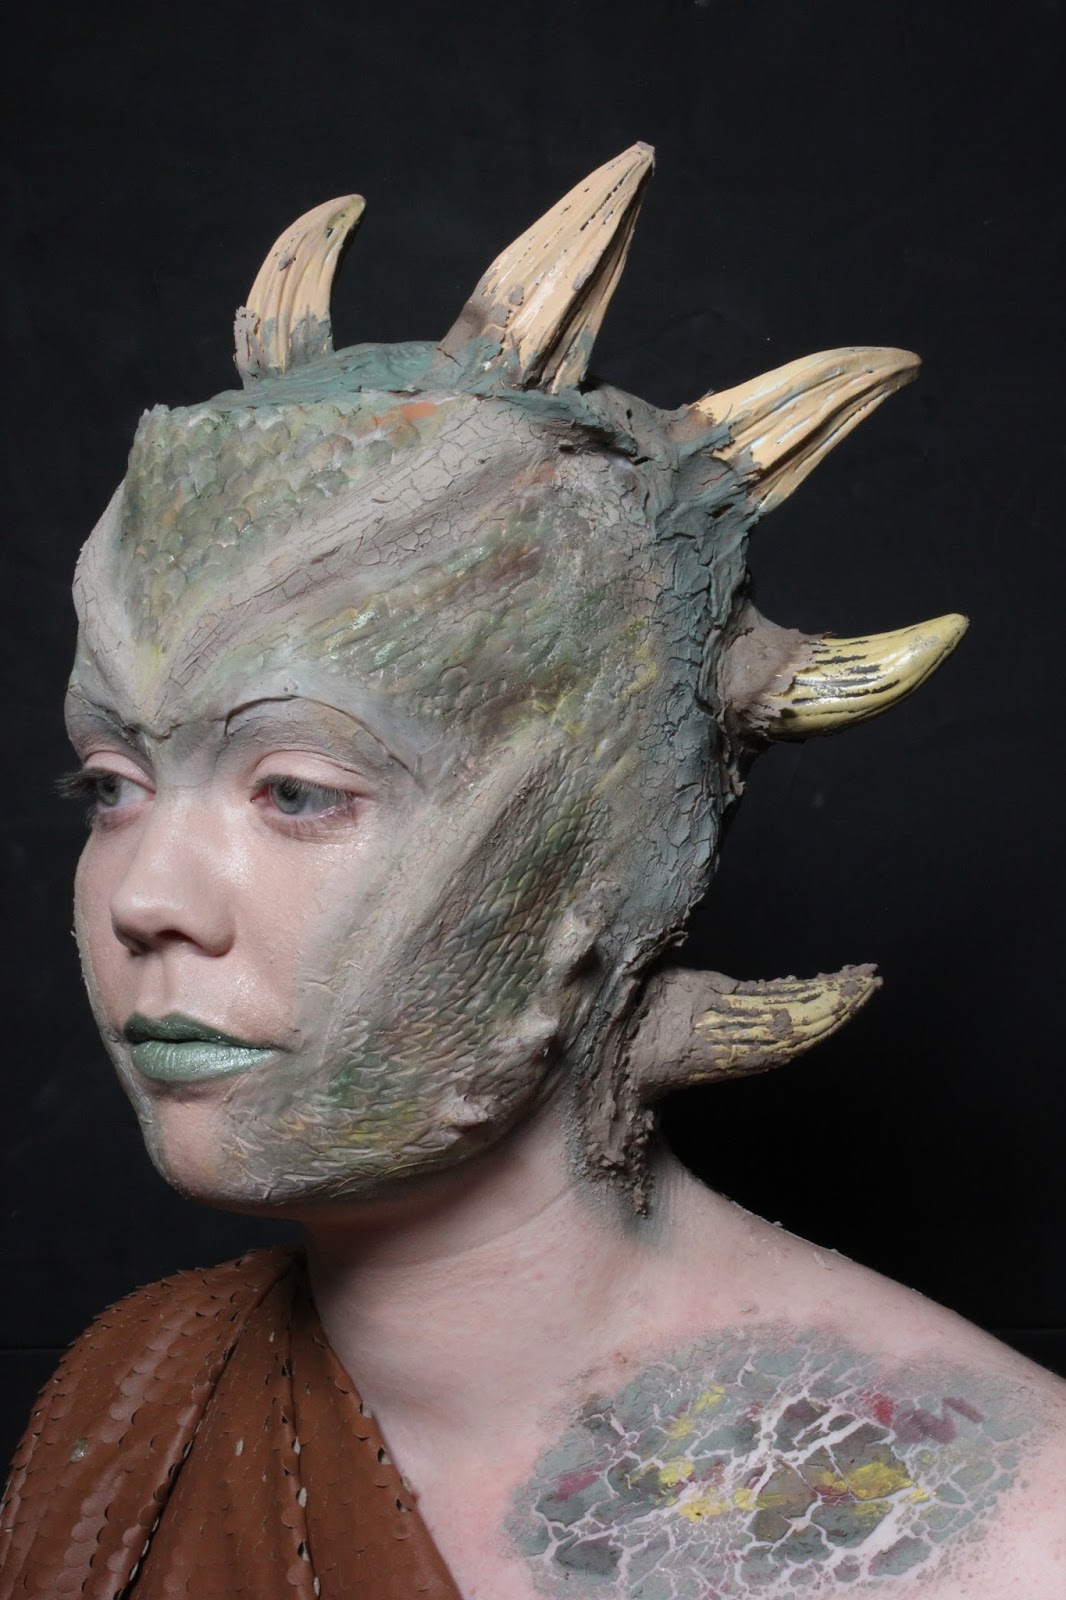


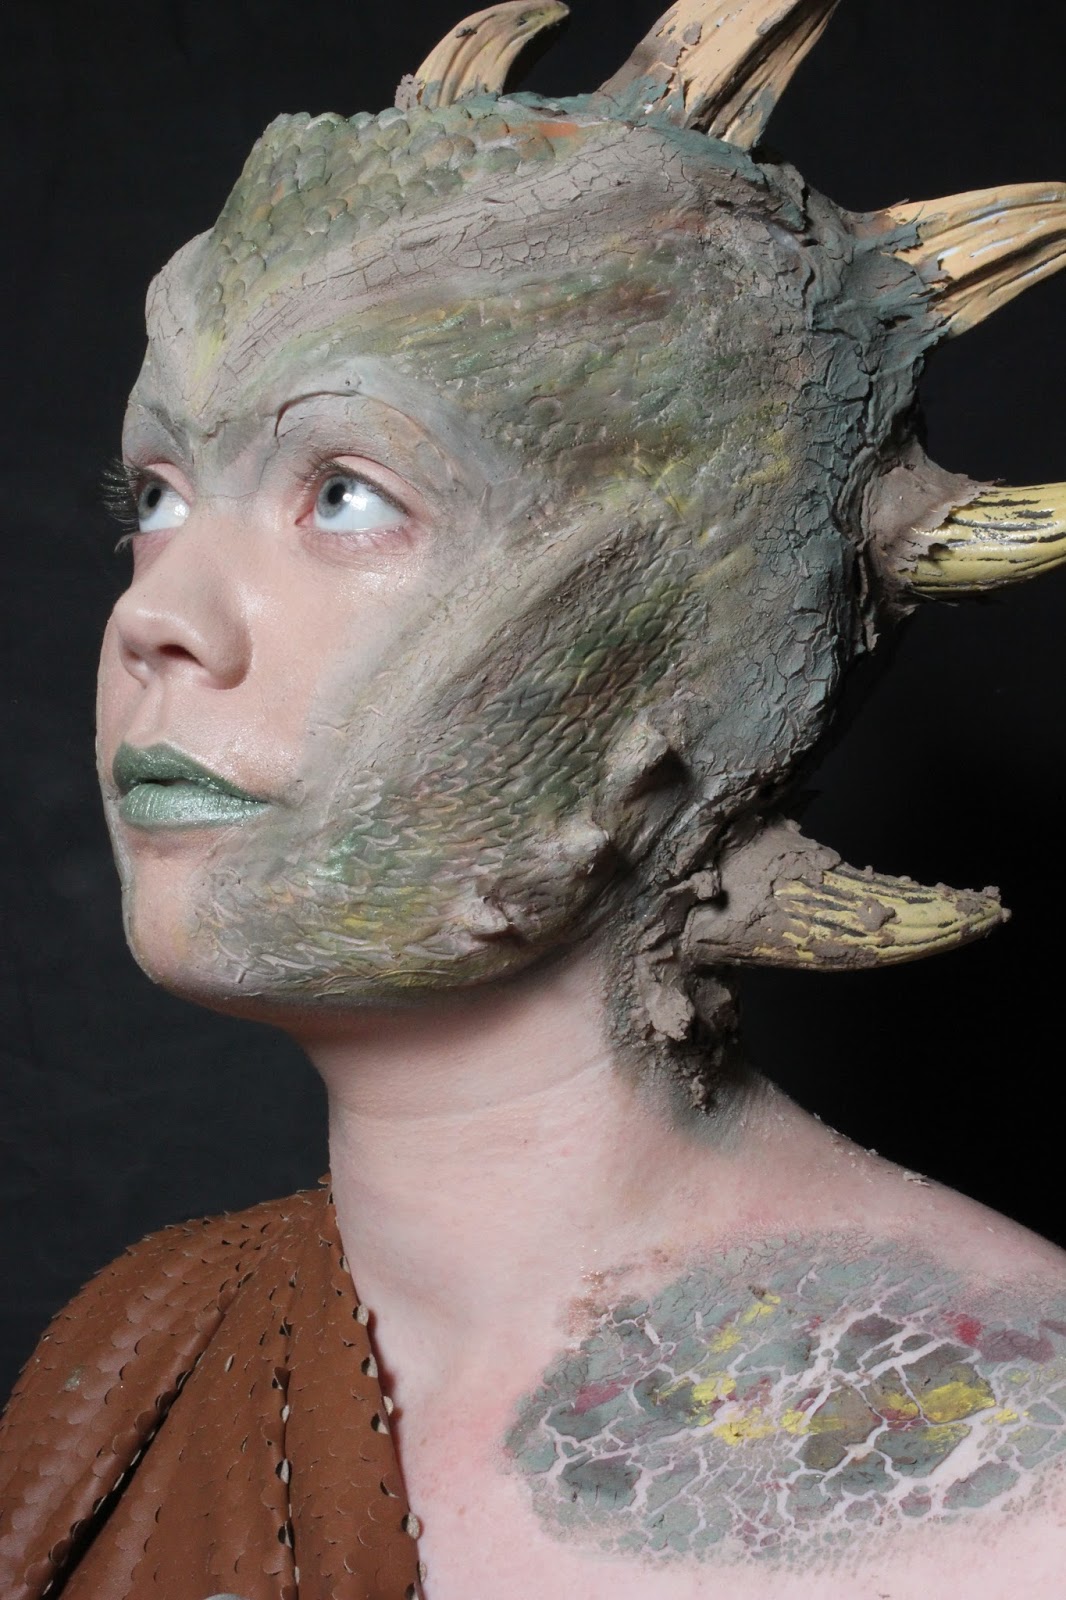

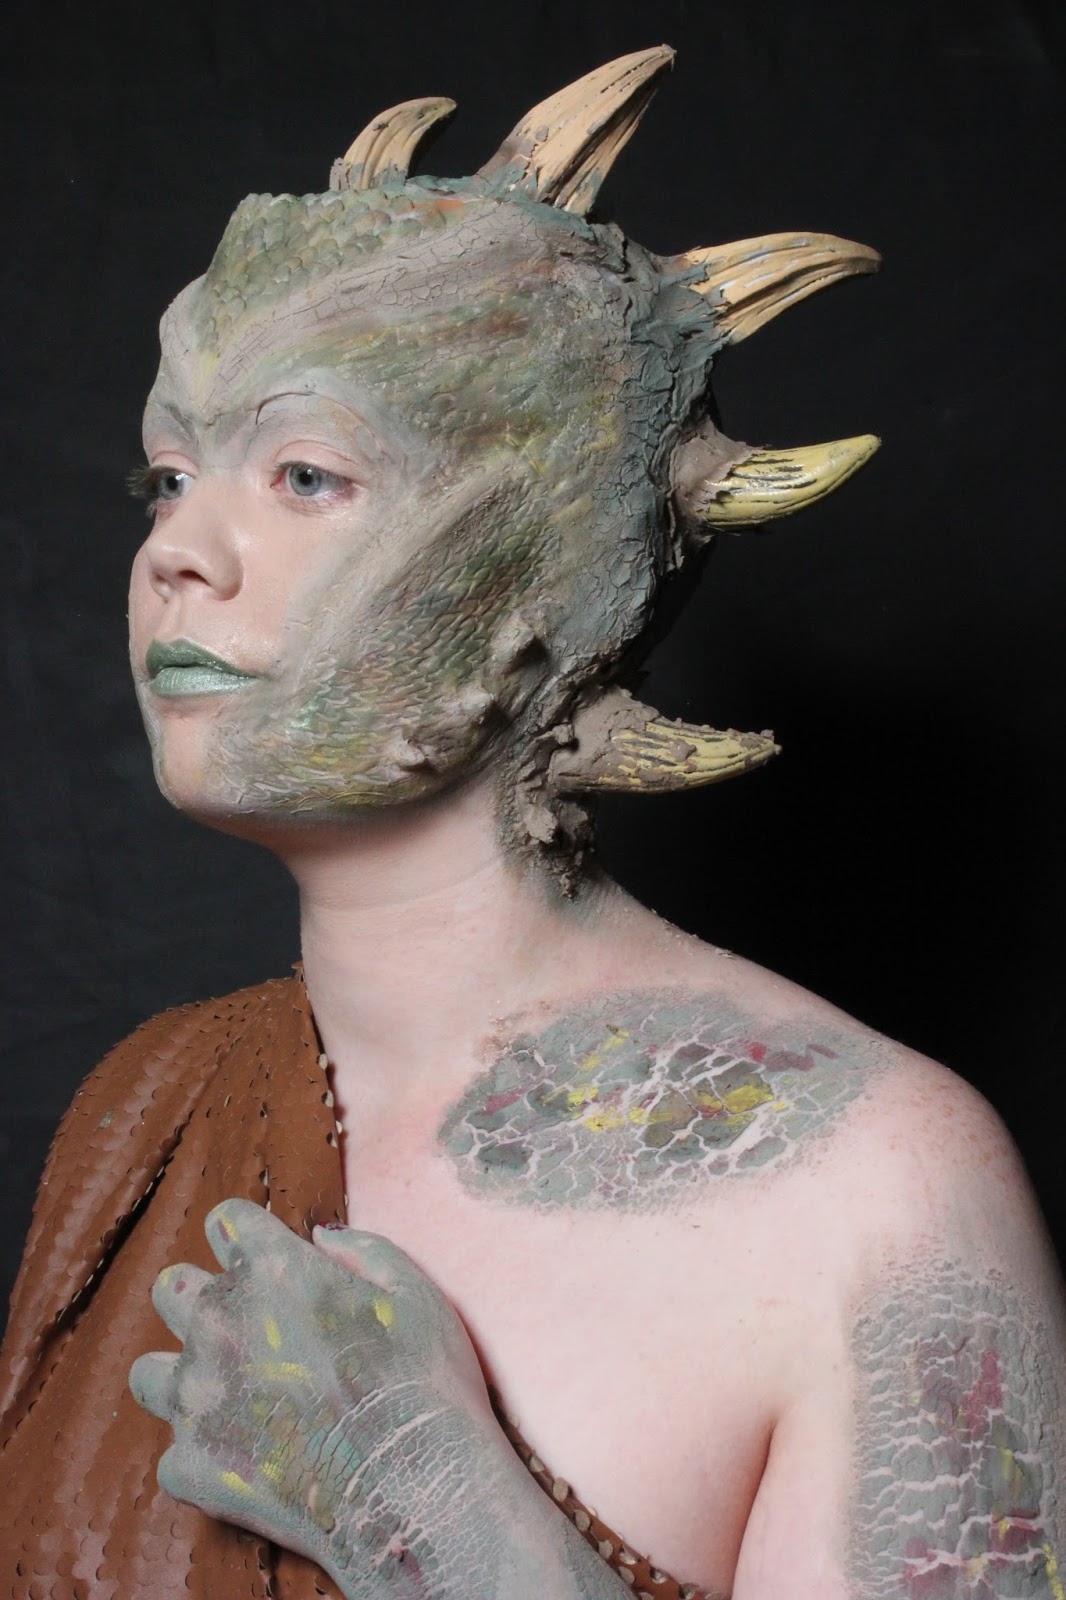
This is my favourite image that I took, as I was able to get most of my look into the image. I asked my model to lift up her hand, so that I could get the scales and colouring of the hands onto the image as well as her face, horns, chest and arm. I really like the composition of this image, as the hand reaching up to the shoulder, and the material that is wrapped around the model lead the viewer's eyes up towards the face of the model. The head is the main part of the image, surrounded by the black background, and then the eye follows back down to the chest and arm. The image also follows the rule of thirds, as the focal point is in the appropriate section. I am pleased with how the scales came out on camera, as they do look really realistic, and the colouring supports this as it brings depth to the look. I am pleased with how the fuller's earth on the head blends into the prosthetic pieces, I think this is mostly down to the colouring, as well as the textures I created on the actual prosthetic pieces. I am not very pleased with the way the fuller's earth has set on the hand, as it didn't crack as much as I wanted it too, which makes it look like I have just used paint and let the paint dry, leading it to crack slightly. The other things that I am not pleased with is the way the prosthetic piece on the forehead set on the eyebrow. Because the piece is a silicone flat mould, it is not extremely flexible, with left the piece bagging over the eyebrow because of where the eye socket goes in. I was not very happy because it makes it look like I haven't blended the piece, when in fact the baldiez is actually below the piece and blended.
My Hybrid GIF

When shooting my hybrid, I wanted to capture many images so that I definitely had many to choose from for the submission. So, I decided to make a GIF of my Human Hybrid, as it shows the movement of my hybrid, and gives the viewer a 360 degree view of my hybrid. Making a GIF is very handy when it comes to showing your work, as instead of having to scroll through a whole list of images, you can see each one, one after another. I think that making a GIF helps me to decide which images I like best, as they stick in my mind more than others when they are flashing on the screen. I made sure that when I was taking my photographs, I got a lot of photos. I worry that if I do not take too many there may not be a good selection when it comes to submission.
Thursday, 26 November 2015
My Hybrid Assessment - Technical Folder
On the day of my assessment, I was really looking forward to completing the entire look. I had practised the makeup, hair, and fuller's earth each on their own, but not altogether. I was nervous as this was a really big task, the biggest that I have ever done so far.
Health and Safety
-Any aerosol sprays need to be sprayed out the window.
-Hair tied up.
-No jewellery.
-New change of gloves after handling products.
-Old clothes.
-Lids on tightly.
-New spatula for each product.
-Wipe down each pot after using it to reduce cross contamination.
-Wear Breathing mask when using the products.
-NEVER pour silicone down the sink.
- Products -
- Hair Gel
- Water Spray
- Pre-Impression Bald Cap
- Paddle Brush
- Sectioning Comb
- Spirit Gum
- Spirit Gum Remover
- Barrier Cream
- Acetone
- Prosthetic Pieces
- Prosaide
- Isopropyl Alcohol
- Cotton Buds
- Fuller's Earth Mixture
- Horns
- TV Paint Stick in Camouflage
- Kryolan UltraFoundation
- Green Metallic SupraColour
- Kryolan AquaColour
- Brush Set
Method:
1. Set up the studio space, using couch roll to cover the surfaces. Prep model and sanitise hands and products.
2. Brush through the hair, and wet down using water spray. Apply the gel to the hair and smooth down.
3. Once the hair is fully smoothed, brush through and wrap the hair around the head, making it as flat as you can.
4. Put on the bald cap, and cut to shape. I have not cut around the ears on my bald cap as I do not want the ears on show for my final look.
5. Turn the edges upwards, and apply spirit gum to both the bald cap and the model's skin. Then, using a damp cloth, press the edges down to remove any creases.

6. Apply Prosaide to the area you will place the prosthetic pieces, as well as the pieces themselves, as Prosaide is a contact glue. I began with the forehead piece as this was the bigger piece, and the other two cheek pieces were going to be layered onto this one.
7. Apply Prosaide to the other two pieces and let dry until it is tacky.
8. Begin to blend down the edges of the prosthetic piece. The Baldiez creates a skin for the piece, which you are able to blend into the skin.

9. Apply the two cheek pieces, and blend the edges out.


10. Once all of the pieces are firmly stuck, you can begin to apply the fuller's earth to the bald cap. I used a medium size flat brush, and applied the fuller's earth all over. I layered it up towards to top of the head, to fill in the space between the prosthetic piece and the head.
11. Stick the horns onto the fuller's earth, and blend into the sides of each horn. Make sure the horns are evenly spaced out.


12. Once the head is covered in the fuller's earth, you can begin to colour. I applied Foundation that matched my model's skin tone to the centre of the face, and blended out onto the prosthetic pieces.

13. Using the Aqua colour, mix a neutral, dusty skin tone. Apply all over the prosthetic pieces as a base colour. Apply the TV paint stick and rub into the scales.

14. From here, now you have the base colours of the prosthetic pieces. Mix up a light, medium and dark tone for each of these colours; green, yellow, brown, red. Work into the scales and the head, to make the pieces have much more depth to them.
15. Apply a thin layer of fuller's earth to the raised, soft areas on the pieces, the brow bones and the cheekbones and let dry.


16. Apply rough layers of fuller's earth to the areas on the rest of the body following the body design. blend in the edges.

18. Apply green lipstick to the model's face to bring the look together.


Altogether, I really enjoyed my Hybrid Assessment. I did come across multiple issues when I was creating the look, but I think I dealt with them quite well. I misplaced the bald cap that I was originally going to use, and had to order one for next day delivery. Other issues I encountered was were the flat mould curved over the eyebrow, and bagged a little. I was worried this made the look quite fake and unrealistic, but I was assured by my tutor that it would not be able to be seen obviously on camera. I am really pleased with the final look, as it is exactly how I envisioned it to look like. Originally I thought I had bit off more than I could chew, but I realised that it was actually more simple than I thought. The whole look from start to finish took me around 5 and a half hours, which is the longest look I have completed to date. It was a very tiring experience, but I was more excited than stressed about completing the look. I am proud of myself to create this look, as it's the most detailed and extravagant look that I have ever completed.
Subscribe to:
Comments (Atom)