On the day of my assessment, I was really looking forward to completing the entire look. I had practised the makeup, hair, and fuller's earth each on their own, but not altogether. I was nervous as this was a really big task, the biggest that I have ever done so far.
Health and Safety
-Any aerosol sprays need to be sprayed out the window.
-Hair tied up.
-No jewellery.
-New change of gloves after handling products.
-Old clothes.
-Lids on tightly.
-New spatula for each product.
-Wipe down each pot after using it to reduce cross contamination.
-Wear Breathing mask when using the products.
-NEVER pour silicone down the sink.
- Products -
- Hair Gel
- Water Spray
- Pre-Impression Bald Cap
- Paddle Brush
- Sectioning Comb
- Spirit Gum
- Spirit Gum Remover
- Barrier Cream
- Acetone
- Prosthetic Pieces
- Prosaide
- Isopropyl Alcohol
- Cotton Buds
- Fuller's Earth Mixture
- Horns
- TV Paint Stick in Camouflage
- Kryolan UltraFoundation
- Green Metallic SupraColour
- Kryolan AquaColour
- Brush Set
Method:
1. Set up the studio space, using couch roll to cover the surfaces. Prep model and sanitise hands and products.
2. Brush through the hair, and wet down using water spray. Apply the gel to the hair and smooth down.
3. Once the hair is fully smoothed, brush through and wrap the hair around the head, making it as flat as you can.
4. Put on the bald cap, and cut to shape. I have not cut around the ears on my bald cap as I do not want the ears on show for my final look.
5. Turn the edges upwards, and apply spirit gum to both the bald cap and the model's skin. Then, using a damp cloth, press the edges down to remove any creases.

6. Apply Prosaide to the area you will place the prosthetic pieces, as well as the pieces themselves, as Prosaide is a contact glue. I began with the forehead piece as this was the bigger piece, and the other two cheek pieces were going to be layered onto this one.
7. Apply Prosaide to the other two pieces and let dry until it is tacky.
8. Begin to blend down the edges of the prosthetic piece. The Baldiez creates a skin for the piece, which you are able to blend into the skin.

9. Apply the two cheek pieces, and blend the edges out.


10. Once all of the pieces are firmly stuck, you can begin to apply the fuller's earth to the bald cap. I used a medium size flat brush, and applied the fuller's earth all over. I layered it up towards to top of the head, to fill in the space between the prosthetic piece and the head.
11. Stick the horns onto the fuller's earth, and blend into the sides of each horn. Make sure the horns are evenly spaced out.


12. Once the head is covered in the fuller's earth, you can begin to colour. I applied Foundation that matched my model's skin tone to the centre of the face, and blended out onto the prosthetic pieces.

13. Using the Aqua colour, mix a neutral, dusty skin tone. Apply all over the prosthetic pieces as a base colour. Apply the TV paint stick and rub into the scales.

14. From here, now you have the base colours of the prosthetic pieces. Mix up a light, medium and dark tone for each of these colours; green, yellow, brown, red. Work into the scales and the head, to make the pieces have much more depth to them.
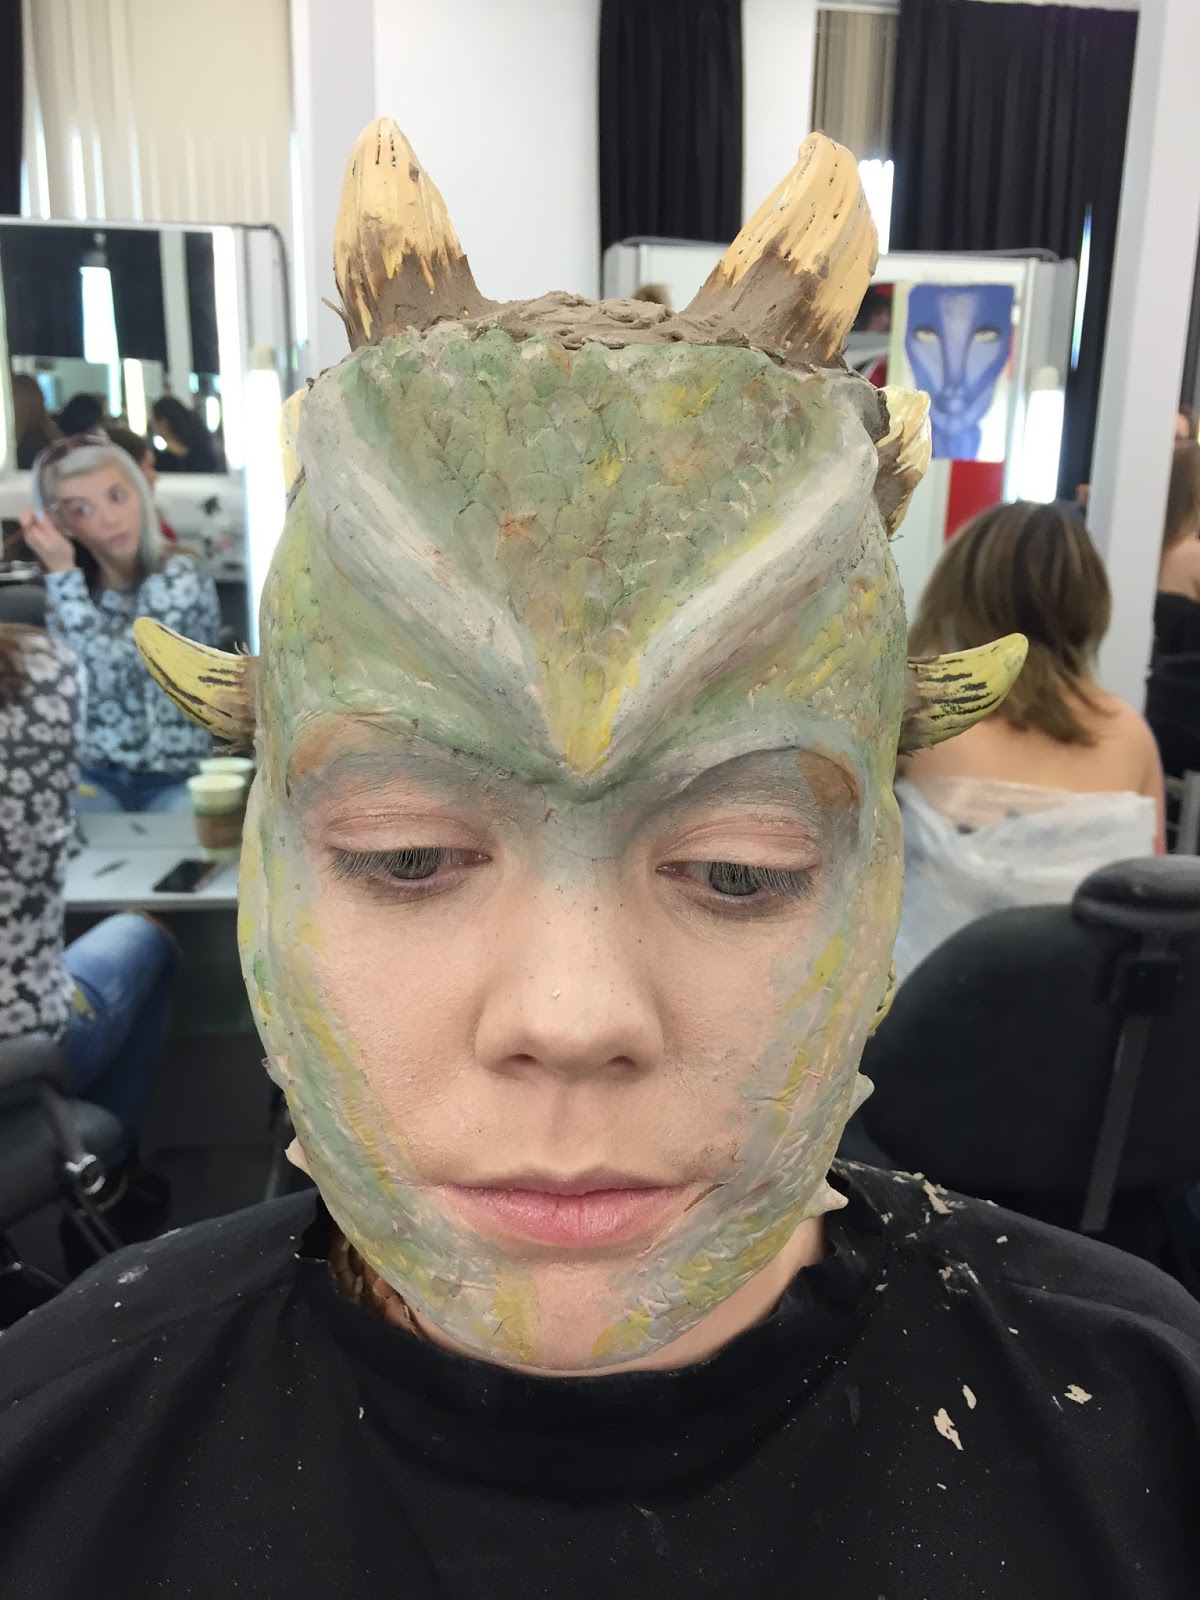
15. Apply a thin layer of fuller's earth to the raised, soft areas on the pieces, the brow bones and the cheekbones and let dry.


16. Apply rough layers of fuller's earth to the areas on the rest of the body following the body design. blend in the edges.

18. Apply green lipstick to the model's face to bring the look together.


Altogether, I really enjoyed my Hybrid Assessment. I did come across multiple issues when I was creating the look, but I think I dealt with them quite well. I misplaced the bald cap that I was originally going to use, and had to order one for next day delivery. Other issues I encountered was were the flat mould curved over the eyebrow, and bagged a little. I was worried this made the look quite fake and unrealistic, but I was assured by my tutor that it would not be able to be seen obviously on camera. I am really pleased with the final look, as it is exactly how I envisioned it to look like. Originally I thought I had bit off more than I could chew, but I realised that it was actually more simple than I thought. The whole look from start to finish took me around 5 and a half hours, which is the longest look I have completed to date. It was a very tiring experience, but I was more excited than stressed about completing the look. I am proud of myself to create this look, as it's the most detailed and extravagant look that I have ever completed.
No comments:
Post a Comment